M3x5.7-OD4.6 Thread Knurled Brass Heat Set Insert Nut
= Heat Resistant Embedment Nut for 3D Printer Accessories =
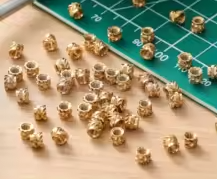
These M3 brass threaded inserts are designed for heatset installation into 3D printed parts, creating durable, reusable metal threads in plastic components. The knurled pattern ensures a secure grip within the material, preventing rotation and pullout .
Creates Strong, Reusable Threads in Plastic - Prevents screw threads from stripping in 3D prints
Efficient Heat Transfer - Brass alloy heats quickly and melts plastic evenly for a secure bond
Heat-set installation is the most common method, using a soldering iron to melt the insert into a printed hole .
The installation temperature should be the filament's printing temperature plus 10-20°C (e.g., ~200°C for PLA, ~230°C for PETG) .
Avoid overtightening screws, as the surrounding plastic can still deform even though the brass insert is strong .
= Technical Specifications =
| Parameter | Value |
|---|
| Thread Size | M3 (3mm) |
| Overall Length (L) | 5.7mm |
| Outer Diameter (OD) | 4.6mm |
| Material | Brass (high thermal conductivity) |
| Knurl Type | Spiral / Opposing (Anti-spin design) |
| Compatible Plastics | PLA, PETG, ABS, PC, PA, Nylon, etc. |
= Key Features =
High Durability - Brass construction withstands repeated assembly/disassembly without stripping
Excellent Thermal Conductivity - Transfers heat quickly to melt surrounding plastic evenly
AntiRotation Design Knurled pattern and serrated flange provide 360° grip to prevent spinning
Precise Installation - Tapered front end aids alignment and insertion into printed holes
Corrosion Resistant - Brass material resists rust and is suitable for electronics and marine use
== Applications ==
- 3D printer motor mounts and structural parts
- Enclosures and housings requiring screw assembly
- Drone frames and RC car chassis
- CNC machined components
- Laptop and electronic device plastic shells
- Robotics joints and mechanical assemblies
Durable Finish Creates professionalquality threaded connections in plastic parts
Reliable Grip Opposing knurl pattern provides excellent pullout and torque resistance
√ 100% Lead and Cadmium Free - Safe for environmental use and RoHS compliant
√ Compatible with PLA, PETG, ABS, and many other filaments
√ Standard M3x0.5 thread for common machine screws
= Installation Guidelines =
Preparation:
- Drill or model hole approximately 4.0mm diameter (check manufacturer specs)
- Hole depth should be insert length + 0.5mm for proper seating
- Add a small chamfer at the hole opening to guide the insert
Installation Steps:
- Insert the tapered end into the prepared hole
- Heat soldering iron to printing temperature + 10-20°C
- Gently press the heated tip onto the insert, applying even vertical pressure
- Continue pressing until the insert is flush with the part surface
Practice on a test print to dial in the correct hole size and installation technique before working on your final part .
= Troubleshooting =
Insert won't sit flush:
- Ensure hole depth is sufficient (at least 6.2mm)
- Increase soldering iron temperature slightly
- Apply steady, even pressure while heating
Insert spins in hole:
- Check hole diameter is correct (~4.0mm)
- Try a larger or more aggressive knurl pattern
- Consider printing a test piece with different hole sizes
Plastic bulging around insert:
- Reduce pressure during installation
- Lower installation temperature slightly
- Ensure wall thickness is adequate (minimum 1.8mm)